[Tips, tricks and behind the scenes a bit.] There are a lot of photographers out there known in the community as the "shoot and burn" type. They will take your picture, burn you a disc of the results, and that's that.
That's just not me.
I love love LOVE spending time behind the computer to customize my images. Each session has a different "look" and "feel" to it...a different recipe that brings out the mood of the moment. This is my art. This is where I play.
Very rarely will you see an un-edited image of mine. During a portrait session, I do show you a few images on the back of my camera just so you can see what we're capturing and know we're on the right track (and can be assured that you look FABULOUS), but very rarely do I share an un-edited image otherwise.
Here's why.
I LOVE the dreamy, creamy, sun-kissed look.The pop of color and brightness.
But being a natural light photographer, I can't control Mother Nature... which means I can't always control my light source (as I'd be able to if I were in a studio setting). Yes, I can use light modifiers such as scrims, reflectors and flash... but those don't always work with my spontaneous, natural shooting style (especially in sessions with wiggly wee ones). And while I've gotten to the point where I actually prefer to work in the sunlight (as opposed to open shade, which is the "beginner's" trick), it doesn't always cooperate.
So while the photos I take look DO look good straight out of the camera (SOOC), I like to give them that extra little "oomph" to get them to that place I visualized when I originally shot the image.
I do use Photoshop... not as a crutch to "fix" images... but as a tool to enhance them.
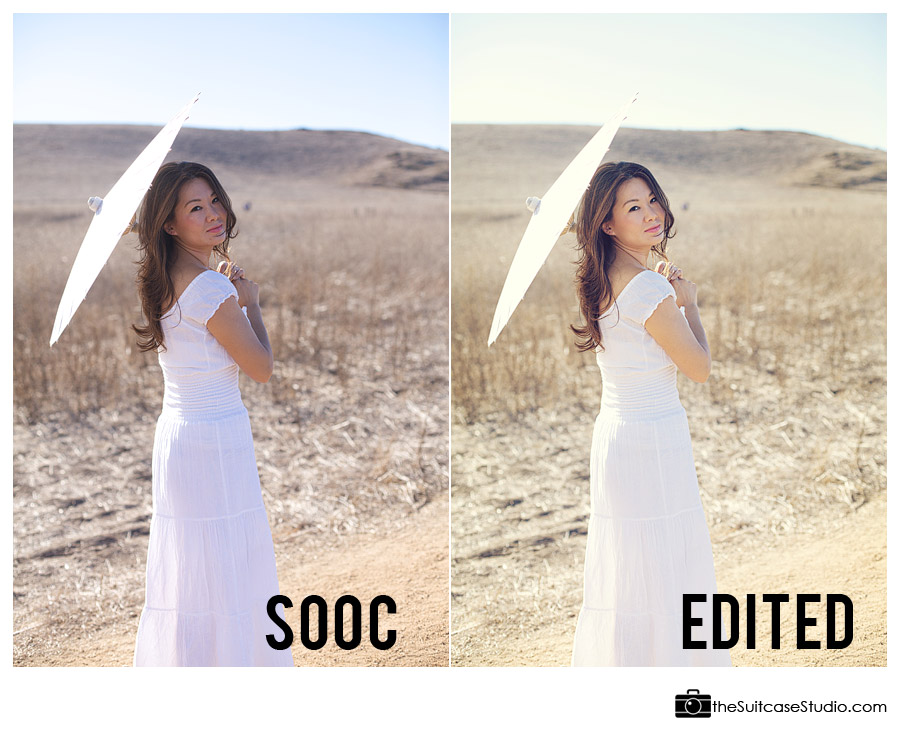
Below is a great example of this.
The image was taken in an open field in pretty harsh light. You can see that the sunlight is coming from the back/left side of the subject. Had this been shot in "automatic" mode with my camera, the sky would be a vivid blue, but the subject's face would be nearly black. Using manual settings I was able to manipulate the scene so that the subject's face (the most important part) was properly exposed. I also used the environment to help manipulate the light... the light colored sand the subject is walking on works as a natural reflector to bounce light back at her, while I angled the paper umbrella she holds to work as a scrim... diffusing the sunlight before hitting her face so there are no harsh shadows.
The image on the left is straight out of the camera (SOOC). Pretty darn good.
But I wanted to add that dreamy, creamy look that I love. So I brightened up her skin and eyes a bit, played with the contrast, and then layered on a few favorite Photoshop "actions" to achieve that warm glow. (A quick note to those of you who dabble with "actions"... here's the trick: do NOT use them in full force.)
And the image on my right is my final product.
OOOooooOOOOOOOOo0ooooohhhhh.

Like what you see? Sign up for my newsletter by clicking the red tab on the left. I've got BIG things planned for next year and you won't want to miss out!
